The Remote Workstation Hardware Guide: Keyboards, Mice, Monitors, Docks & Chairs

By Holive · Founder & Editor-in-Chief
Holive is the founder and editor-in-chief of Toolisme. Before starting the site, he was a product manager at two SaaS startups, where he spent countless hours comparing tools for his own teams. He launched Toolisme to spare other teams that same trial and error.
You spend 8+ hours a day at this desk. Money spent on the points of contact — keyboard, mouse, monitor, chair — pays back in hands, wrists, neck and focus. Budget in this order: input, display, connectivity, support.
We sit at a desk 8+ hours a day. Count it up and the keyboard, mouse, monitor, and chair are the devices we touch longer than anything else we own. Yet most people happily spend thousands on the computer itself, then cheap out on the things their body actually touches — a $15 keyboard, a screen that strains the eyes after two hours, a chair that hurts.
Hardware has a strong diminishing-returns curve: money spent on RGB lighting and flashy cases stops paying off fast, while money spent on the contact points — keyboard, mouse, monitor, chair — buys back hands, wrists, neck, and focus, dollar for dollar.
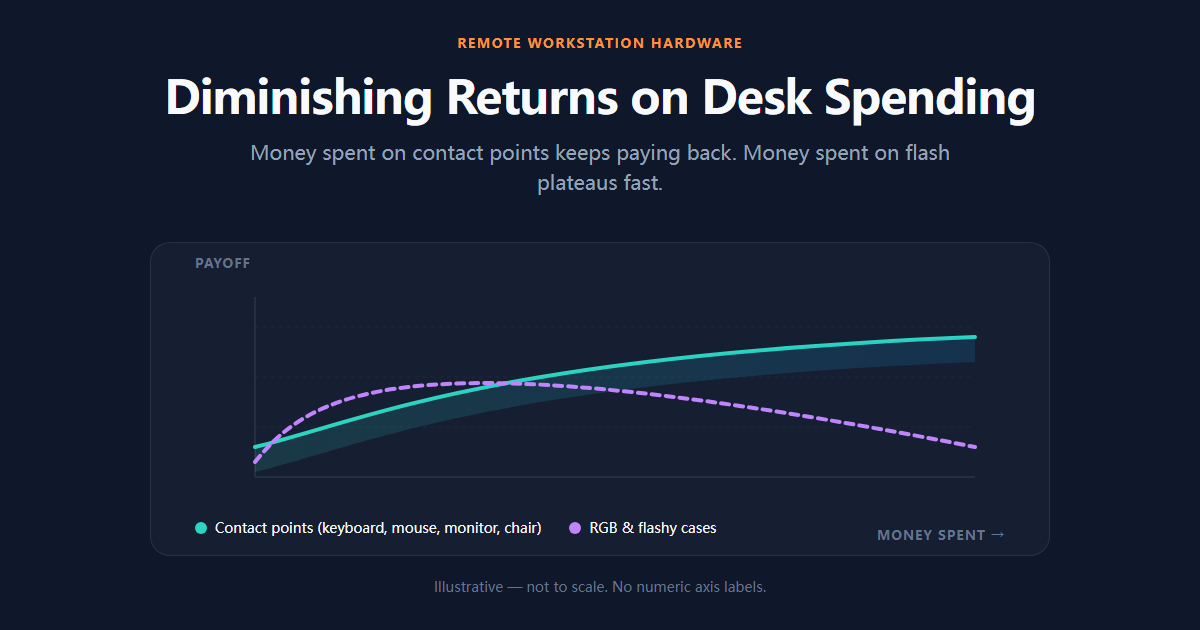
So this guide breaks the desk into five modules, and tells you the order to spend in: Input (keyboard & mouse) → Display (screen & light bar) → Connectivity (dock & cable management) → Support (standing desk & chair). Fix your hands and eyes first, then your cables and your back.
Module 1: The Keyboard — fix your hands first
The keyboard is the device your hands touch most. It deserves the most thought. Three questions decide it:
1. Structure: gasket or tray?
Structure sets the floor for feel. Gasket mounts put a buffer between the plate and the case, so key presses have a little give — softer, cleaner-sounding, and the default in the custom world. Traditional tray-mount boards are firmer and louder, but cheap and reliable.
Our honest take: if you type a lot (code, writing, messages), the gasket "soft landing" genuinely tires your fingers less. If you type occasionally and budget matters, a tray board is fine — don't let spec sheets bully you.
2. Connection: why tri-mode is basically a requirement
Tri-mode = Bluetooth + 2.4G + wired. Switching between laptop, desktop, and tablet is the normal rhythm of remote work, and a tri-mode board flips between them with one keypress instead of cable-swapping. If you only ever use one device, save the money. Multi-device people: just get tri-mode.
3. Switches: linear or tactile?
- Linear: straight up and down, smooth, quiet-ish. Built for long fast typing (coding, writing) and shared spaces.
- Tactile: a clicky bump halfway down, satisfying feedback, louder, and slightly more finger fatigue on marathon sessions.
Shared office? Go linear. Own the room and want feedback? Try tactile. Unsure? Get a hot-swappable board and try everything — switches are the cheapest thing to experiment with on the whole desk.
💡 The basics (layout compatibility, ports, build quality, warranty) are covered step by step in our how to choose a mechanical keyboard. Read that one before diving deeper.
Want an aluminum, tri-mode, gasket-soft production board? We took a real test run at the Keychron Q1 Max — QMK/VIA remapping, feel, build, battery life, all broken down in the review. It's also listed on Amazon year-round if you'd rather check price and stock there:
👉 Check Keychron Q1 Max Price (Amazon) →
💡 Keyboard decision logic: answer the three questions — structure → connection → switch — in order, and you've locked in the right board.
Module 2: The Mouse — don't let "mouse hand" ruin your wrists
Keyboards get the love, but the mouse causes the strain. Forearm tension and wrist pain (that's carpal tunnel territory) are some of the most common remote-worker complaints. Two paths when you shop:
- Productivity: look for free-spin / fast-scroll wheels and multi-device switching — drag files across screens, fly through long documents.
- Wrist health: look for a ~57° vertical ergonomic mouse that keeps your forearm in a natural handshake position.
📌 Our picks
【Flagship all-rounder】Logitech MX Master 3S For: developers, editors, multitaskers 8000 DPI tracking on glass, silent clicks, magnetic scroll wheel, copy-paste across Mac/Windows with one gesture.
👉 Check Logitech MX Master 3S Price (Amazon) →
【Wrist-first】Logitech MX Vertical / Lift For: 6+ hours of mouse time a day, sore wrists 57° upright grip relieves wrist pressure. Small hands → Lift; bigger hands → MX Vertical.
👉 Check Logitech MX Vertical Price (Amazon) →
👉 Check Logitech Lift Price (Amazon) →
Module 3: The Display — clarity and neck health in one shot
One big screen or two? The eternal remote-work debate.
- Single 4K ~32": no bezel gap, immersive, best for deep single-task focus — coding, video editing, long reads.
- Dual monitors: one main + one reference (chat, research, timelines) — best for multitasking workflows like writing with sources open or editing with a timeline.
There's no universal answer; it follows your workflow. Our experience: get one screen big enough to carry your main task, then decide on a second. A lot of people's first screen is too small — a second monitor just splits the squinting into two.
Three eye-care checks before you buy:
- Dimming: avoid low-frequency PWM; high-frequency or DC dimming is kinder on the eyes — flicker-sensitive people notice the difference within an hour.
- Color gamut: designers and video people watch sRGB/DCI-P3 coverage; pure office work doesn't need to pay for wide gamut.
- Mount height: the top of the screen should sit at or slightly below eye level. A monitor arm raises the panel to the right height — better for your neck than any massage app.
A light bar earns its spot too: at night, desk lamps take up space and bounce glare off the screen. An asymmetric light bar (the BenQ ScreenBar family and cheaper alternatives) lights the desk, not the display, and frees up the surface. One of the best value-per-dollar additions to the whole desk.
Module 4: Connectivity — from cable spaghetti to one-cable life
Plugging and unplugging the laptop — monitor, keyboard, mouse, drive — every time you sit down gets old fast. A Thunderbolt docking station fixes it:
- One cable: the laptop docks with a single Thunderbolt cable; display, ethernet, peripherals, and power all route through the dock. Sit down, plug in one cable. Leave, unplug one cable.
- What to check: charging wattage (will it power your laptop?), video output (dual 4K?), and port count (USB-A / USB-C / card reader).
CalDigit, Anker, and Ugreen all have solid lines — pick by ports, not by the flagship badge. If you only dock occasionally, a simple USB-C to HDMI adapter might be all you need. Think about how often you actually dock before you spend.
Two cheap wins people skip: cable trays / velcro to tuck the spaghetti under the desk, and the monitor arm we mentioned above. Together they cost less than a dinner out and change both the look of the desk and the posture you hold all day.
Module 5: Support — the keyboard and screen can't save your back
Last and most expensive: ergonomic chairs and standing desks. A great keyboard and monitor do nothing for lower back pain.
Standing desk (sit-stand rhythm): Dual-motor, quiet, decent weight capacity is the mainstream sweet spot (FlexiSpot, Autonomous, that family). Alternate 45 minutes sitting / 15 standing — the standing desk is the closest thing to an antidote for desk posture. Tight budget? Start with a manual crank or just the legs, upgrade to motorized later.
👉 Check Standing Desk Prices (Amazon) →
Ergonomic chair: This is where "you get what you pay for" shows up hardest on the whole desk. Entry-to-mid: Branch / Ergohuman class. Budget unlimited: Herman Miller Aeron / Embody and the other classics. Before you buy any "ergonomic" chair, check three adjustments: lumbar height, seat depth, armrests. A chair that can't adjust isn't ergonomic — it just looks like it.
👉 Check Ergonomic Chair Prices (Amazon) →
How to split three budgets (with recommended combos)
Allocation for three common budgets (excluding the computer), in the "input > display > connectivity > support" order:
| Budget | Keyboard & mouse | Display & mount | Support & connectivity | What you get |
|---|---|---|---|---|
| $500 entry | Tri-mode entry board + solid office mouse | 27" 2K high-refresh + basic arm | Laptop stand + basic ergo chair + USB-C adapter | Hands and eyes taken care of first |
| $1500 mid | Gasket tri-mode + MX Master 3S-class mouse | 27-32" 4K one-cable + monitor arm | Entry standing desk + mid ergo chair + Thunderbolt dock | Cable chaos gone, sit-stand rhythm works |
| $3000 high | Custom kit + flagship keyboard & mouse | 32" 4K flagship + premium arm | High-end standing desk + Herman Miller-class chair + dock | Every node lasts years without regret |
Watch-outs: keyboards and chairs have the wildest price spread — the same model varies a lot across channels. Monitors: judge the panel specs, not the "gaming" label. On a tight budget, spend on the keyboard first — it's the most-touched device and the biggest feel difference per dollar.
Bottom line
One more time: keyboard & mouse first, then display, then connectivity and support. Spend in that order and every dollar lands on a contact point your body actually feels.
For the keyboard rabbit hole, start with our how to choose a mechanical keyboard — compatibility through warranty, step by step. Our deep-dive on the Keychron Q1 Max — a production custom keyboard broken down on structure, switches, feel, and side by side — is live now. Watch the Hardware category for more, or browse all buyer's guides.
💡 Like every guide here, hardware follows the same structure: framework first, checklist second, real testing last — the framework builds the map, the tests tell you if the specs actually feel good.
P.S.
This is the hardware pillar of our guide series. The software pillar (how to choose SaaS & AI tools) and the security pillar (creator & digital nomad security guide) are both live — bookmark guides and build your whole stack.
Keyboard Picker
Build your keyboard in 3 questions
Structure → connection → switch. Answer in order and you've locked in the right board.
Holive
Founder & Editor-in-ChiefHolive is the founder and editor-in-chief of Toolisme. Before starting the site, he was a product manager at two SaaS startups, where he spent countless hours comparing tools for his own teams. He launched Toolisme to spare other teams that same trial and error.